Some Important Tips of Microsoft Word
Q1. How to move around a Document
The cursor (mouse pointer) in the document tells you where you’re typing. Wherever the blinking cursor is located, the letters that you type will be inserted at that position. When you start a plain document, the blinking cursor will be at the start of your document ready for you to start typing. As you type, the cursor will also shift with each letter.
When
the mouse pointer is moved over a text part, the pointer will change from an
arrow to a ‘text select’ icon.
Shift the text select mouse pointer with your
mouse to where you would like to modify or add text. Click the left-hand mouse
button. This will then position the blinking cursor at the point where you have
clicked so that you can edit or insert text.
You can also
shift around your document using the arrow keys on the keyboard.
Pressing these arrow keys will move the blinking
cursor up a line of text, down a line or left one character or right one
character. Using a mixture of keystrokes can also move the cursor further –
example, holding down the Ctrl (control) key and pressing the left arrow key
will move the cursor left one word. Holding down Ctrl and press the up arrow
key will move the cursor to the beginning of each paragraph.
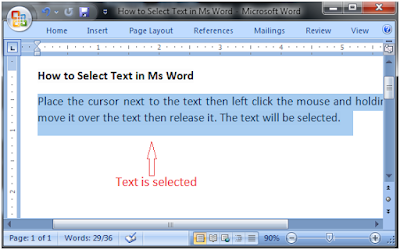
The mouse can be used to select text. When the mouse indicator is moved over a text area, the indicator will change from an arrow to a ‘text select’.
Shift the text select mouse indicator with your mouse to where you’d like to start your selection. Click and hold down the left mouse button. After this, shift the mouse across your text to where you’d like the selection to stop. As you move the mouse, the content will be selected. When you’ve completed your selection, release the left mouse button.
The selected text can now be format or changed if required.
You can also shift
and select text using the arrow keys on the keyboard, which some people may
find easier than the mouse. If you use a mixture of keyboard keys – example,
holding down Ctrl and Shift and pressing the left or right arrow key – you can shift
the cursor and select the text in other directions.
Once text is selected, it can be changed or edited as required
Q3.
How to format Text
If you like to change some of the text that you have already typed to a different font, it will need to be selected with the mouse first. When the mouse indicator is moved over a text area, the indicator will change from an arrow to a ‘text select’.
Select the text that you like to edit or
change the formatting.
To modify the selected font to bold, click B in the formatting ribbon at the top of the document.
To modify the selected font to italics, click I in the formatting ribbon at the top of the document.
To modify the selected text so that it’s underlined, click U in the formatting ribbon at the top of the document.
It’s also
possible to modify selected text using a mixture of keyboard shortcuts, which
some people find easier than using the mouse.
Q4. How to E-mail a Document
Follow
these step-by-step instructions: -
Step 1: Log in to your email account so that you are
on the dashboard of your mail account.
Step 2: Click Compose.
Step 3: your
new email is open, type your recipient’s email address in the ‘To’ field. Then
put a title in the ‘Subject’ box and type your message.
Step 4: Click on the paper pin icon at the bottom
of the compose window.
Step 5: Look around your Windows folders until you
reach the document you want to attach to your email. Choose this by clicking on
it and then click Open. This will add the document as an attachment to your
email.
Step 6: Your document has been attached to you
email by its file name seeming in blue text at the bottom of the compose dialogue
box.
Step 7: If you want to attach another document,
repeat steps 4 and 5.
Step 8: When you are ready to send your email, click Send.


Thank you!! It's easy to understand.
ReplyDeleteThank you 😊
DeleteThe information you provided is very best. I would recommend each and every one to read this blog.
ReplyDeleteThank you 😊
Delete